As the Japanese prepared to attack the newly-discovered enemy ships, the U.S. carriers already had a strong striking force in the air. Launched between 0700 and 0900, the American planes included three squadrons of torpedo bombers and five squadrons of dive bombers, plus escorting fighters. However, due to the urgent need to hit the Japanese before they could launch their own attack, this force was badly coordinated and exposed to defeat in detail.
At about 0915, the Japanese made a sharp change in course to get closer to the American ships, and the first U.S. Navy carrier planes sighted their targets. Shortly thereafter, fifteen TBD-1 "Devastators" of Lieutenant Commander John C. Waldron's Torpedo Squadron Eight (VT-8), from USS Hornet, bravely pressed their attack against a swarm of nimble and deadly "Zero" fighters. All were shot down, and only one man, Ensign George Gay, survived.
During the next hour, two more torpedo attacks came in, with similar results. USS Enterprise's Torpedo Squadron Six (VT-6), led by Lieutenant Commander Eugene E. Lindsey, unsuccessfully pursued Kaga, losing all but five of fourteen TBDs to the Japanese defenses. Only two planes escaped from Lieutenant Commander Lance E. Massey's Torpedo Squadron Three (VT-3), from USS Yorktown. Six Fighting Squadron Three (VF-3) F4F-4 "Wildcats", led by Lieutenant Commander John S. Thach, tried to help VT-3, but were so badly outnumbered by "Zeros" that they could not be of much assistance.
While VT-3 was making its doomed effort, three squadrons of SBD-3 "Dauntless" bombers arrived high overhead. Two, Bombing Squadron Six (VB-6) and Scouting Squadron Six (VS-6) from Enterprise, led by Lieutenant Commander Clarence W. McClusky, had been fruitlessly searching for the Japanese carriers when they found and followed the destroyer Arashi as she sped to join her fleet after depth charging USS Nautilus. The third, Yorktown's Bombing Squadron Three (VB-3), led by Lieutenant Commander Maxwell F. Leslie, arrived virtually simultaneously from another direction. At about 1025, with the Japanese fighters still at low altitude fighting off torpedo planes, and blessed with an extremely lucky degree of coordination, these squadrons commenced one of history's most dramatically decisive attacks.
The SBDs plunged down on the startled Japanese, who were turning into the wind to fly off their own striking force. Flight decks were crowded with armed, fueled planes, and hangar decks held other planes and much unstowed ordnance. Multiple bomb hits ignited fatal conflagrations on three of the four Japanese carriers, which were immediately put out of action, ending any realistic hope of Japanese victory in this battle. As they burned, Lieutenant Commander William H. Brockman, undeterred by earlier depth charge attacks, brought USS Nautilus in submerged and fired torpedos at Kaga. However, as would commonly be the case until more than half-way through 1943, the only "fish" that hit failed to explode. Consumed by fires and explosions, Kaga and Soryu sank late in the afternoon. Akagi followed them before dawn the next day.
This page presents views of the dive bomber and submarine attacks on the three Japanese carriers.
For views of launching of U.S. Navy planes for this attack
and of related activities on the American aircraft carriers, see:
For links to pictures relating the other attacks on the
Japanese carriers, see:
For links to views of other aspects of the Battle of Midway,
see:
| If you want higher resolution reproductions than the Online Library's digital images, see: "How to Obtain Photographic Reproductions." |
Click on the small photograph to prompt a larger view of the same image.
|
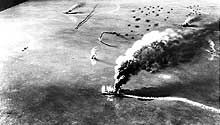
Photo #: 80-G-701869 Battle of Midway, June 1942 Diorama by Norman Bel Geddes, depicting the attack by USS Enterprise (CV-6) and USS Yorktown (CV-5) dive bombers on the Japanese aircraft carriers Akagi, Kaga and Soryu in the morning of 4 June 1942. The diorama was created during World War II on the basis of information then available. It is therefore somewhat inaccurate in scope and detail. This angle of view depicts Soryu (attacked by Yorktown aircraft) in the middle distance, with Kaga and Akagi (both attacked by Enterprise aircraft) as the closer two burning ships. Official U.S. Navy Photograph, now in the collections of the National Archives. Online Image: 73KB; 740 x 380 pixels Reproductions of this image may also be available through the National Archives photographic reproduction system. |
 |
|
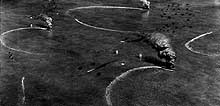
Photo #: 80-G-701870 Battle of Midway, June 1942 Diorama by Norman Bel Geddes, depicting the attack by USS Yorktown (CV-5) and USS Enterprise (CV-6) dive bombers on the Japanese aircraft carriers Soryu, Akagi and Kaga in the morning of 4 June 1942. The diorama was created during World War II on the basis of information then available. It is therefore somewhat inaccurate in scope and detail. This angle of view is essentially the reciprocal of that shown in Photo # 80-G-701869. It depicts Soryu (attacked by Yorktown aircraft) in the center foreground, with Kaga and Akagi (both attacked by Enterprise aircraft) as the two most distant burning ships. The burning ship at far right is a light cruiser, which had been erroneously reported to have been hit. Official U.S. Navy Photograph, now in the collections of the National Archives. Online Image: 95KB; 740 x 445 pixels Reproductions of this image may also be available through the National Archives photographic reproduction system. |
 |
|
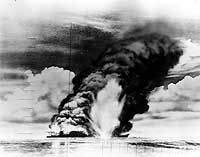
Photo #: 80-G-701871 Battle of Midway, June 1942 Diorama by Norman Bel Geddes, depicting the attack by USS Nautilus (SS-168) on a burning Japanese aircraft carrier during the early afternoon of 4 June 1942, as seen through the submarine's periscope. Nautilus thought she had attacked Soryu, and that her torpedoes had exploded when they hit the target. Most evidence, however, is that the ship attacked was Kaga, and that the torpedoes failed to detonate. The ship shown in this wartime diorama does not closely resemble either of those carriers. Official U.S. Navy Photograph, now in the collections of the National Archives. Online Image: 75KB; 740 x 605 pixels Reproductions of this image may also be available through the National Archives photographic reproduction system. |
 |
One of the Great Mysteries of the Sea? |
For views of launching of U.S. Navy planes for this attack
and of related activities on the American aircraft carriers, see:
For links to pictures relating the other attacks on the
Japanese carriers, see:
For links to views of other aspects of the Battle of Midway,
see:
NOTES:
| If you want higher resolution reproductions than the Online Library's digital images, see: "How to Obtain Photographic Reproductions." |
Page made 23 April 1999
Text revised and coding updated 24 April 2009