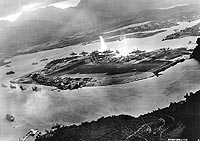
When the first Japanese attack wave arrived over Pearl Harbor seven of their primary targets, the U.S. battleships, were moored along "Battleship Row", on the eastern side of Ford Island. Another battleship was in drydock in the nearby Navy Yard. Other moorings which the Japanese believed might include battleships, or the equally important aircraft carriers, were at the Navy Yard's 1010 Dock and along Ford Island's western side.
The Japanese initially hit airfields, including that on Ford Island. Dive bombers attacked there at about 7:55 AM, destroying many aircraft, among them PBY patrol planes at the island's southern tip. This attack prompted the dispatch of the famous message "Air raid, Pearl Harbor -- this is no drill", the outside World's first indication that war had come to the Pacific.
Within a few moments, torpedo planes attacked from east and west, with one of the latter torpedoing the USS Helena at 1010 dock. Others, from the same direction, hit USS Utah and USS Raleigh, off the western side of Ford Island.
The great majority of the torpedo planes came in from the east, flying up the waterway between Pearl Harbor Navy Yard and the Submarine Base to hit the ships on that side of Ford Island. They put two "fish" into USS California, at the southern end of the row. At the northern end, another struck USS Nevada. The outboard ships in the center of "Battleship Row", USS Oklahoma and West Virginia, each had their port sides torn open by many torpedoes.
As the torpedo planes were completing their work, horizontal bombers swept up "Battleship Row", dropping armor-piercing bombs. Several ships were hit. One received a death blow, as USS Arizona blew up with a tremendous explosion.
Planes of the second attack wave revisited some of the ships already hit, and also spread destruction in the Navy Yard, where they bombed the drydocked battleship Pennsylvania and three destroyers. Other dive bombers went after the Nevada, which had left her berth and was trying to get to sea. Very heavy anti-aircraft gunfire greeted these aircraft, whose losses were significantly greater than those of the first attack wave.
The raiders had no opportunity to hit American aircraft carriers, all of which were at sea, and did not target fuel storage, most cruisers and destroyers, submarines and most maintenance facilities. However, in just under two hours they had wrecked the U.S. Pacific Fleet's battleship force, ensuring that it would not interfere with Japan's plans for conquest.
This page features overall views of the Japanese attack on Pearl Harbor, 7 December 1941.
For additional pictorial coverage of the Japanese attack
on Pearl Harbor, see:
| If you want higher resolution reproductions than the Online Library's digital images, see: "How to Obtain Photographic Reproductions." |
Click on the small photograph to prompt a larger view of the same image.
|
Photo #: NH 50929 Pearl Harbor Attack, 7 December 1941 Halftone reproduction of a photograph taken from a Japanese plane during the torpedo attack on the ships moored on both sides of Ford Island. View looks about southeast, with Honolulu and Diamond Head in the right distance. Torpedoes have just struck USS West Virginia and USS Oklahoma on the far side of Ford Island. On the near side of the island, toward the left, USS Utah and USS Raleigh have already been torpedoed. Fires are burning at the seaplane base, at the right end of Ford Island. Across the channel from the seaplane base, smoke along 1010 Dock indicates that USS Helena has also been torpedoed. Japanese inscriptions at the bottom indicate that this view was published by Osaka University. U.S. Naval History and Heritage Command Photograph. Online Image: 115KB; 740 x 535 pixels |
 |
|
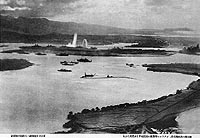
Photo #: NH 50930 Pearl Harbor Attack, 7 December 1941 Photograph taken from a Japanese plane during the torpedo attack on ships moored on both sides of Ford Island. View looks about east, with the supply depot, submarine base and fuel tank farm in the right center distance. A torpedo has just hit USS West Virginia on the far side of Ford Island (center). Other battleships moored nearby are (from left): Nevada, Arizona, Tennessee (inboard of West Virginia), Oklahoma (torpedoed and listing) alongside Maryland, and California. On the near side of Ford Island, to the left, are light cruisers Detroit and Raleigh, target and training ship Utah and seaplane tender Tangier. Raleigh and Utah have been torpedoed, and Utah is listing sharply to port. Japanese planes are visible in the right center (over Ford Island) and over the Navy Yard at right. Japanese writing in the lower right states that the photograph was reproduced by authorization of the Navy Ministry. U.S. Naval History and Heritage Command Photograph. Online Image: 99KB; 740 x 545 pixels |
 |
|
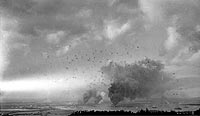
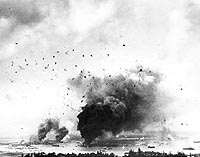
Photo #: 80-G-32792 Pearl Harbor Attack, 7 December 1941 Panorama view of Pearl Harbor, during the Japanese raid, with anti-aircraft shell bursts overhead. The photograph looks southwesterly from the hills behind the harbor. Large column of smoke in lower right center is from the burning USS Arizona (BB-39). Smoke somewhat further to the left is from the destroyers Shaw (DD-373), Cassin (DD-372) and Downes (DD-375), in drydocks at the Pearl Harbor Navy Yard. Official U.S. Navy Photograph, now in the collections of the National Archives. Online Image: 48KB; 740 x 455 pixels Reproductions of this image may also be available through the National Archives photographic reproduction system. |
 |
|
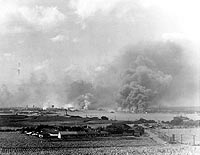
Photo #: 80-G-40056 Pearl Harbor Attack, 7 December 1941 View of Pearl Harbor looking southwesterly from the hills to the northward. Taken during the Japanese raid, with anti-aircraft shell bursts overhead. Large column of smoke in lower center is from USS Arizona (BB-39). Smaller smoke columns further to the left are from the destroyers Shaw (DD-373), Cassin (DD-372) and Downes (DD-375), in drydocks at the Pearl Harbor Navy Yard. This view appears to be a cropped version of Photo # 80-G-32792. Official U.S. Navy Photograph, now in the collections of the National Archives. Online Image: 75KB; 740 x 605 pixels Reproductions of this image may also be available through the National Archives photographic reproduction system. |
 |
|
Photo #: NH 97376 Pearl Harbor Attack, 7 December 1941 View looking toward the Pearl Harbor Navy Yard from the Aiea area, in the morning of 7 December 1941, during or soon after the end of the Japanese air raid. USS Nevada (BB-36) is in the center distance. Large column of smoke to the left of her is from USS Shaw (DD-373), burning in the floating drydock YFD-2. "Battleship Row" is in the right center. Largest mass of smoke there comes from USS Arizona (BB-39). Official U.S. Navy Photograph, from the collections of the Naval History and Heritage Command. Online Image: 74KB; 740 x 600 pixels |
 |
|
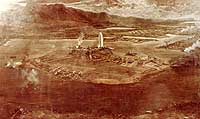
Photo #: NH 86637-KN (Color) Pearl Harbor Attack, 7 Decmeber 1941 Japanese war art painting, in oils, by Tsuguji Fujita, 1942, depicting attacks around Ford Island. The original painting measures about 2.7M by 1.7M. Courtesy of the U.S. Air Force Art & Museum Branch (their accession # 277.53), 1978. U.S. Naval History and Heritage Command Photograph. Online Image: 97KB; 740 x 465 pixels Note: This photograph is at least a second generation reproduction. Better quality photographs may be available from the Air Force. |
 |
|
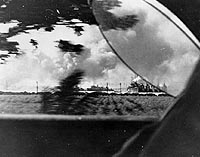
Photo #: 80-G-33045 Pearl Harbor Attack, 7 December 1941 View taken around 0926 hrs. in the morning of 7 December, from an automobile on the road in the Aiea area, looking about WSW with destroyer moorings closest to the camera. In the center of the photograph are: USS Dobbin (AD-3), with destroyers Hull (DD-350), Dewey (DD-349), Worden (DD-352) and MacDonough (DD-351) alongside. The ship just to the left of that group is USS Phelps (DD-360), with got underway on two boilers around 0926 hrs. The group further to the right consists of: USS Whitney (AD-4), with destroyers Conyngham (DD-371), Reid (DD-369), Tucker (DD-374), Case (DD-370) and Selfridge (DD-357) alongside. USS Solace (AH-5) is barely visible at the far left. Official U.S. Navy Photograph, now in the collections of the National Archives. Online Image: 90KB; 740 x 605 pixels Reproductions of this image may also be available through the National Archives photographic reproduction system. |
 |
|
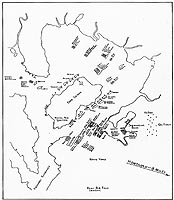
Photo #: NH 83109 Pearl Harbor Raid, 7 Decmeber 1941 Chart showing the positions of ships inside Pearl Harbor at the time of the Japanese Attack, at about 0800 on 7 December. The orientation of the compass direction arrow in the chart's center is turned approximately 45 degrees too far in a counterclockwise direction. Some of the ships moored in "nests" in the northern part of the harbor are listed in incorrect order. Collection of Vice Admiral Homer N. Wallin, USN(Retired), 1975. U.S. Naval History and Heritage Command Photograph. Online Image: 131KB; 915 x 1075 pixels |
 |
|
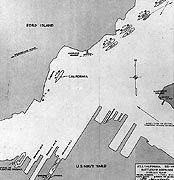
Photo #: NH 83108 Pearl Harbor Raid, 7 Decmeber 1941 Chart showing battleship moorings and positions of ships in the Pearl Harbor Navy Yard drydocks, the direction of the initial Japanese torpedo plane attack, and the direction of movement of USS Nevada (BB-36) and USS Vestal (AR-4). The chart was prepared by the Bureau of Ships. Collection of Vice Admiral Homer N. Wallin, USN(Retired), 1975. U.S. Naval History and Heritage Command Photograph. Online Image: 93KB; 630 x 675 pixels |
 |
For additional pictorial coverage of the Japanese attack
on Pearl Harbor, see:
NOTES:
| If you want higher resolution reproductions than the Online Library's digital images, see: "How to Obtain Photographic Reproductions." |
Page made 21 October 2000
Coding updated 17 April 2009