This page features views related to HMAS Hobart's wartime actions and activities.
For more images of this ship, see:
| If you want higher resolution reproductions than the digital images presented here, see: "How to Obtain Photographic Reproductions." |
Click on the small photograph to prompt a larger view of the same image.
|
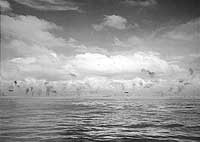
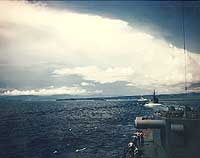
Photo #: NH 97753 Guadalcanal-Tulagi Operation, August 1942 Japanese Navy Type 1 land attack planes ("Betty") make a torpedo attack on the Tulagi invasion force, 8 August 1942. The ship faintly visible in the center is HMAS Hobart. Guadalcanal is in the distance. The original photograph came from Rear Admiral Samuel Eliot Morison's World War II history project working files. U.S. Naval Historical Center Photograph. Online Image: 63KB; 740 x 550 pixels |
 |
|
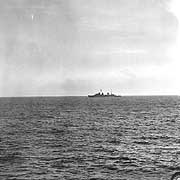
Photo #: NH 97945 HMAS Hobart (Australian Light Cruiser, 1936) Steaming in the Coral Sea, west of Espiritu Santo, about two hours before she was torpedoed by a Japanese submarine, 20 July 1943. Photographed from USS Nicholas (DD-449). Official U.S. Navy Photograph, from the collections of the Naval Historical Center. Online Image: 85KB; 650 x 675 pixels |
 |
|
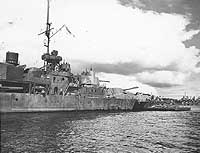
Photo #: NH 80532 HMAS Hobart (Australian Light Cruiser, 1936) View taken at Espiritu Santo, New Hebrides, on 23 July 1943, showing damage inflicted when she was torpedoed by a Japanese submarine on 20 July. Photographed from off the port side, showing the ship's badly distorted stern, after 6-inch gun turrets, anti-splinter mats on the after superstructure and surface search radar (probably Type 271) at left. Collection of Admiral Harry W. Hill, USN (Retired), 1976. U.S. Naval Historical Center Photograph. Online Image: 103KB; 740 x 590 pixels |
 |
|
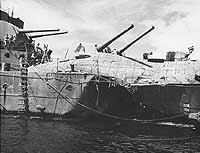
Photo #: NH 80533 HMAS Hobart (Australian Light Cruiser, 1936) View taken at Espiritu Santo, New Hebrides, on 23 July 1943, showing damage inflicted when she was torpedoed by a Japanese submarine on 20 July. Photographed from off the port side, showing the ship's badly distorted stern and after 6-inch guns. Deck planking has been removed by the ship's crew. Note: the size of the torpedo hole; Jacob's ladder at left; and draft markings at right. Collection of Admiral Harry W. Hill, USN (Retired), 1976. U.S. Naval Historical Center Photograph. Online Image: 104KB; 740 x 590 pixels |
 |
|
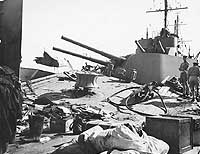
Photo #: NH 80534 HMAS Hobart (Australian Light Cruiser, 1936) View taken at Espiritu Santo, New Hebrides, on 22 July 1943, showing damage inflicted when she was torpedoed by a Japanese submarine on 20 July. Photographed on the quarterdeck, looking forward from about 204 frame starboard side, showing the ship's badly distorted after deck and the after 6-inch gun turrets. Note: capstan, deck ventilators and debris. Collection of Admiral Harry W. Hill, USN (Retired), 1976. U.S. Naval Historical Center Photograph. Online Image: 115KB; 740 x 595 pixels |
 |
|
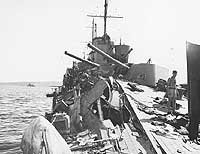
Photo #: NH 80535 HMAS Hobart (Australian Light Cruiser, 1936) View taken at Espiritu Santo, New Hebrides, on 22 July 1943, showing damage inflicted when she was torpedoed by a Japanese submarine on 20 July. Photographed on the quarterdeck, looking forward from about 207 frame port side, showing the ship's badly distorted after deck and the after 6-inch gun turrets. Collection of Admiral Harry W. Hill, USN (Retired), 1976. U.S. Naval Historical Center Photograph. Online Image: 100KB; 740 x 595 pixels |
 |
|
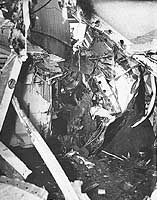
Photo #: NH 80536 HMAS Hobart (Australian Light Cruiser, 1936) View taken at Espiritu Santo, New Hebrides, on 22 July 1943, showing damage inflicted when she was torpedoed by a Japanese submarine on 20 July. Photographed inside the Ward Room, looking aft from about frame 173 and 9 feet inboard. Note cable jammed under "Y" Gunhouse. Part of partition between Ward Room and Ante Room is in the foreground. Black triangular-shaped plating displaced upward at right is part of the Ante Room deck. Note that deck plating has been forced away from the gun turret base, opening the compartment to the sky. Collection of Admiral Harry W. Hill, USN (Retired), 1976. U.S. Naval Historical Center Photograph. Online Image: 129KB; 580 x 765 pixels |
 |
|
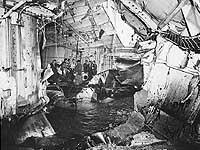
Photo #: NH 80537 HMAS Hobart (Australian Light Cruiser, 1936) View taken at Espiritu Santo, New Hebrides, on 29 July 1943, showing damage inflicted when she was torpedoed by a Japanese submarine on 20 July. Photographed looking aft from the center line of the Ward Room from about 179 station, after clearing away the majority of the wreckage. Note foundation for the after gun turret at left and inwardly displaced plating around the torpedo hole, at right. Collection of Admiral Harry W. Hill, USN (Retired), 1976. U.S. Naval Historical Center Photograph. Online Image: 158KB; 740 x 580 pixels |
 |
|
Photo #: 80-G-K-6300 (Color) Subic Bay, Luzon, Philippine Islands A force of U.S. and Australian cruisers steams into Subic Bay following exercises, circa August 1945. The lead ship (in the left center distance) is either HMAS Australia or HMAS Shropshire. Next astern is HMAS Hobart, followed by a U.S. Navy New Orleans class heavy cruiser and a USN Brooklyn class light cruiser. The photograph was taken from another Brooklyn class cruiser, one of whose 6"/47 triple gun turrets is in the right foreground. Official U.S. Navy Photograph, now in the collections of the National Archives. Online Image: 72KB; 740 x 610 pixels Reproductions of this image may also be available through the National Archives photographic reproduction system. |
 |
For more images of this ship, see:
| If you want higher resolution reproductions than the digital images presented here, see: "How to Obtain Photographic Reproductions." |
Page made 3 May 2002