
Restricted
| Don't shoot from the hip . . . | |
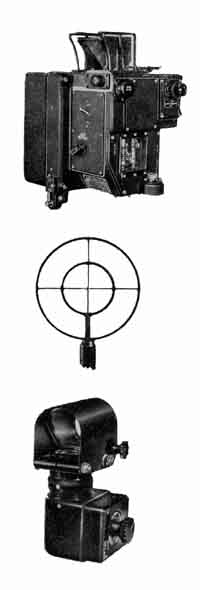 | In the excitement of combat too many gunners spray their bullets at the enemy like a movie cowboy shooting from the hip. Don't do it. Use your sight—and use it correctly—or you won't stand a chance of hitting. You will only throw away ammunition on which your life may depend. Firing a gun from a fast moving bomber is far different from shooting on the ground. Except for one very rare case, you can't possibly hit a fighter by pointing your gun straight at him. You must aim a certain distance away, called deflection. To apply the right amount of deflection you use your sight. Two main types of sights are used by air gunners. Computing sights calculate the deflection automatically. You make certain adjustments. The sight does the rest. How to use computing sights is explained in the last part of this section. But if your guns have ring
sights, you must measure off the deflection yourself. You can only do so by
using the accurate and combat-tested method of sighting called Position Firing,
which is explained in these pages. Ring sights fail into two classes. One kind—the
iron sight—is simply an iron ring-near the back of the gun which you line
up with a bead on a post at the front of the gun. The other kind—the, reflector
sight—uses a system of lenses to make the ring, the center bead and the enemy
fighter all appear on the same glass screen. |
Restricted
S-2
 | |
| |
| 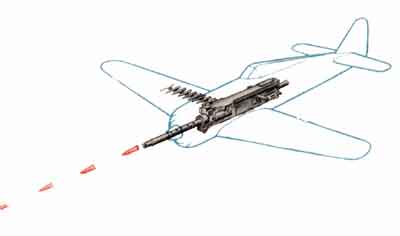 |
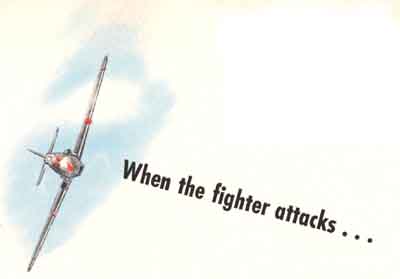
His guns are fixed.
They are mounted in his wings and fuselage, pointing straight ahead. To aim them,
he must aim his entire plane. He is really nothing but a flying gun. To hit you,
he must point his nose at a spot ahead of the nose of your bomber, so that To do this he can make
a fly-through attack, or he can fly a pursuit curve. | |
Restricted
S-3
Fly-through attacks . . . | |
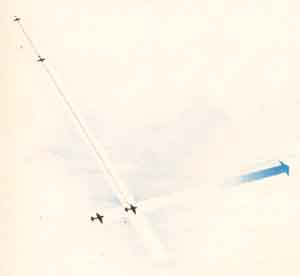 |
. . . are as simple as this picture indicates. The fighter flies in a straight
line and fires at a point he expects your bomber to cross. He lays down a screen
of fire and hopes that you will fly through it. |
Pursuit curve attacks . . . | |
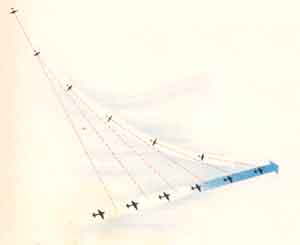 | . . . develop like this. They are the standard type of fighter attack, and the most dangerous. Instead of intercepting your bomber with his bullets for just
an instant, the fighter tries to maintain a continuous attack, in order to keep
pouring a constant stream of bullets at you. To do this he must continue to point
ahead of the bomber's nose. He must keep turning in the direction the bomber is
flying. His path becomes a smooth curve. He has no choice— either he flies
the curve or his bullets won't keep hitting. Because you know that he must fly
this curve, he becomes an easy shot. Position Firing tells you how to hit him
on that curve. |
A typical pursuit curve: the fighter does this | |
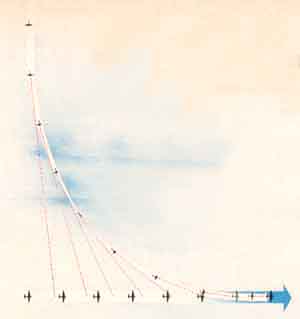 |
As the fighter follows a pursuit curve, continually keeping his guns on a point ahead of the bomber, he moves closer and closer until he slides in behind the bomber's tail. Since the fighter is faster, he quickly closes in. Finally he gets so close that he must break off the attack. This is the real
motion of a fighter on a pursuit curve from the beam, straight out
from the side of the bomber, as it would be seen from another plane high overhead. |
A
typical pursuit curve: the gunner sees this | |
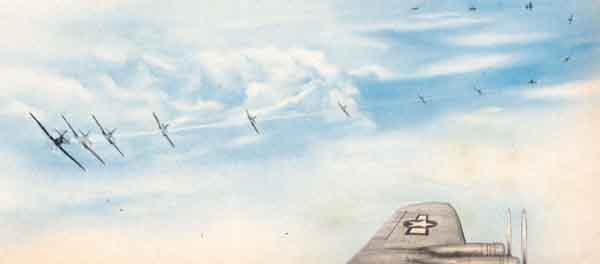 | |
Although the fighter really flies in a curve, he always looks to you as though he slides sideways, in a straight line, toward your bomber's tail. This is the line of the fighter's apparent motion. He also keeps getting bigger, because he is coming closer—fast. To you in the bomber, the beam attack above looks like this. |
Restricted
S-5
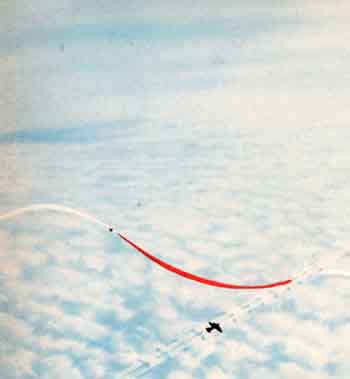 | 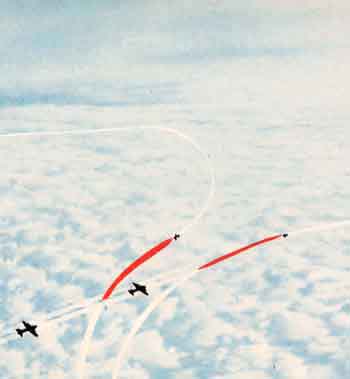 |
| Pursuit curve attack from the side. | Pursuit curve attack from the bow. |
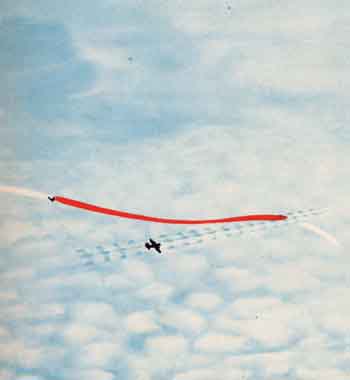 | 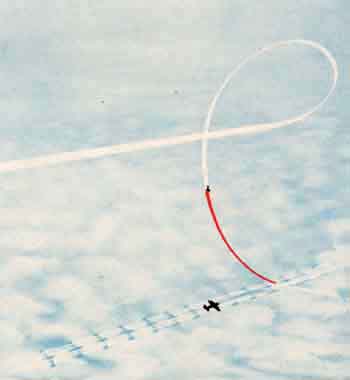 |
| Pursuit curve attack from the tail, | Pursuit curve attack from the overhead. |
Restricted
S-6
Fighters will try anything . . .They may come in from the side, the bow, the tail, or even from overhead. But all these attacks have one thing in common, as shown on the opposite page. No matter from
what direction the fighter approaches, he must maneuver into a position where he can get his guns bearing on you.To keep them bearing he must fly a pursuit curve.
That is the part of the attack where he is really dangerous to you,
and fortunately, that's where Position Firing makes him easiest for you to hit.Fighters will try anything . . .
This is not as self-evident as it seems, because when you are flying in a bomber, you're rarely conscious of your own motion.
But the simple fact that you are moving at high speed is of the greatest importance in learning where to aim.
Believe it our not—
Your bullets do not go where you point your gun.
Restricted
S-7
The newsboy's lesson . . . Every newsboy soon learns the basic trick of aiming from his moving bicycle. The first time he tosses a newspaper he discovers a simple fact: if he aims directly at a front porch, he misses, and the paper lands next door. The forward motion of his bicycle carries the newspaper forward, too. | 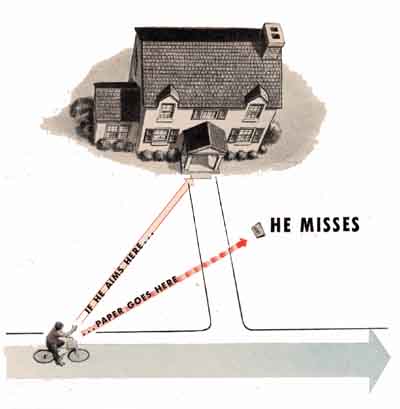 |
To hit the porch, the newsboy must aim like this. | 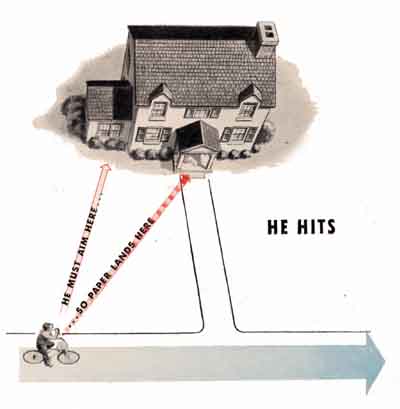 |
Restricted
S-8
. . . applies to bombers, too The same thing happens to a bullet fired from a moving plane. Before the bullet is fired, it is carried forward in the same direction as the bomber. When the gun is fired, the bullet shoots out of the barrel in a different direction. As soon as it leaves the muzzle, the bullet turns and follows a path between those two directions. It keeps the forward motion given it by the moving bomber. You
will miss if you fly over a field and shoot like this at a fighter on the ground. | 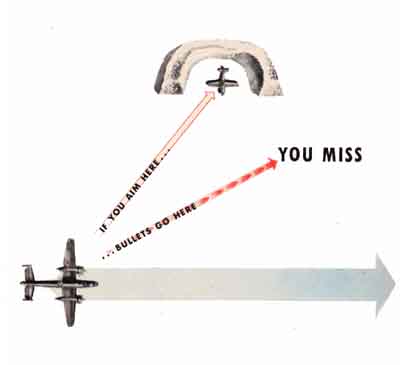 |
To hit, you must aim like this. | 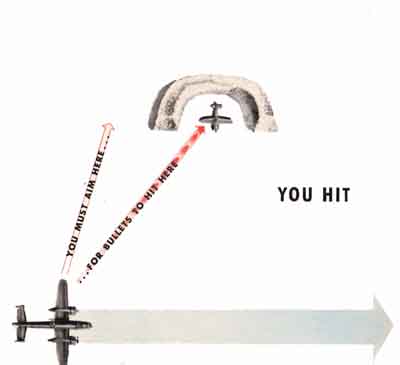 |
Restricted
S-9
Hitting a moving fighter . . . If the fighter is moving toward your bomber,
you must still allow for the forward motion of your bullet. If you aim at a point
ahead of the moving fighter, as you aim ahead of a running fox, you will miss.
Your bullets, carried forward, will pass in front of the fighter. | 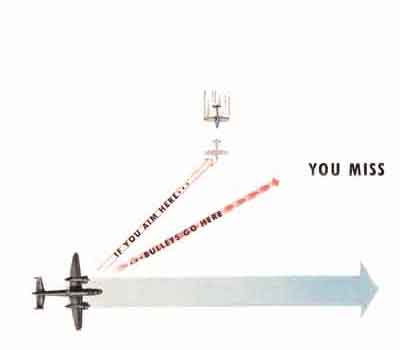 |
To hit, You must aim like this. Then the fighter
and your bullets will arrive at the same place at the same time. | 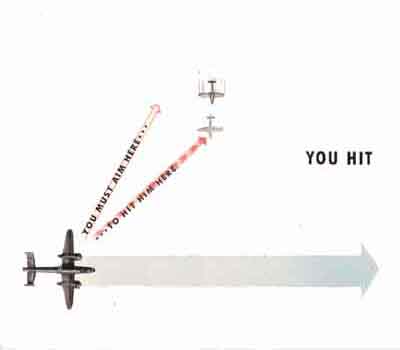 |
Restricted
S-10
Hitting
a fighter on a If the bomber and fighter are both in the air, and the fighter is making a pursuit curve attack, the same principle holds. If you try to lead ahead of a fighter, as you ordinarily
would aim at a flying duck, you will miss, because your bullet, carried forward
by your own speed, goes ahead of him. | 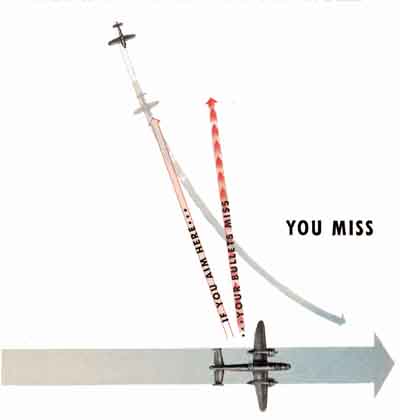 |
To hit, you must aim like this. Position Firing corrects for the distance your bullet is carried forward so that it will meet the fighter instead of passing in front of him. | 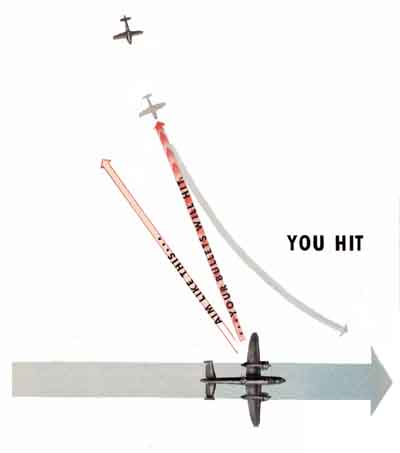 |
Restricted
S-11
Where
you aim... Like the boy on the bicycle, you must always allow for this forward motion. Make this allowance by using the first rule of Position Firing: | |
 | |
| Always aim between the attacking fighter | |
| and the tail of your own bomber | |
| along the line of the fighters apparent motion | |
This line of his apparent motion is always in the direction of that spot on the horizon toward which your bomber's tail points.
| Rads . . . | 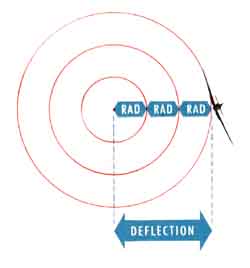 |
| The amount you aim away from the fighter is called deflection.
It is measured in Rads—the distance between the center and the inner
ring, or the distance between two rings in your 35-70 mil ring sight. | |
Restricted
S-12
The
right deflection Therefore the Second Rule is: |
|  |
| 45 degrees | 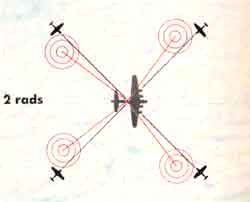 |
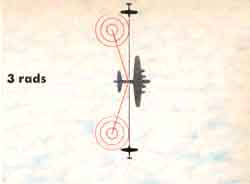
If you are flying in a bomber whose speed is 200 knots and fire at a ninety degree angle-straight out from the beam—you must make the maximum allowance of 3 rods for the amount the bullet is carried forward. When you fire dead ahead or dead astern, the forward motion of your bomber does not change the direction of your bullet; therefore, the direction is 0 or point blank. At any other angle in between, the right amount of deflection is somewhere between 3 and 0 rads. Learn the deflections for the key directions
of attack shown alongside. When you are assigned to a squadron you must learn
the right deflections in accordance with the normal speed of the bombers in your
squadron. | 22 1/2 degrees | 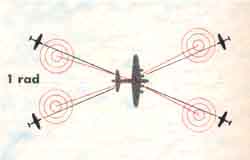 |
| 11 1/4 degrees | 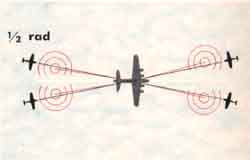 | |
| 0 degrees | 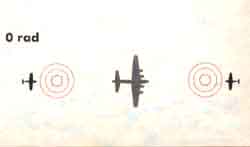 |
Restricted
S-13
The
number or Rads . . . It makes no difference whether the fighter attacks from the right side or the left . . . or whether he attacks from above or below. | 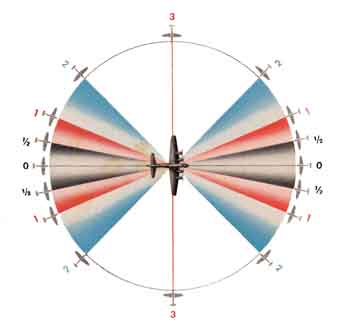 |
| When the fighter attacks from a certain angle he may be at your level, or he may be above you or below you. But it's still the same angle. Think of that angle as rotating around the fore and aft axis of your bomber so that it forms the surface of a cone. | 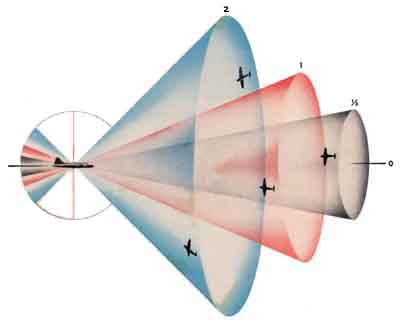 |
Restricted
S-14
The
cones tell you the deflection... Remember these imaginary cones by their numbers—1/2,
1, 2, 3. The number of the cone gives you the deflection in rods for any fighter
on the surface of that cone, whether he attacks from the right or the left; high,
level, or low, based on your bomber's speed. |
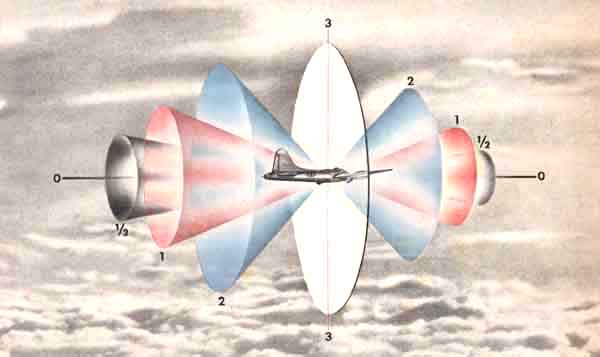 |
Know your true airspeed... Changes in the speed of the fighter on the pursuit curve do not change your deflection. BUT CHANGES IN YOUR TRUE AIRSPEED DO CHANGE YOUR DEFLECTION. The deflections shown above are correct for 200 knots true airspeed of the bomber. To hit an attacking fighter on cone 1/2—off your fore-and-aft axis—use 1/2 rad deflection. For a fighter on cone 1, use 1 rod, and for a fighter on cone 2, use 2 rods of deflection. The 3 rad position—at right angles to your line of flight—is a wheel rather than a cone. But the same rule applies: for a fighter in this position, use 3 rods of deflection. (A good rule of thumb to remember is:—For each 25 knots increase in bombers speed, increase deflection 1/3 rad. For each 25 knots decrease in bombers speed, decrease deflection 1/3 rad.) Check your true airspeed with your pilot, navigator or bombardier. |
Restricted
S-15
The illustrations on these two pages demonstrate how to apply Rules 1 and 2—using the three-ring optical sight which is shown in all the drawings in this section. Note, on both pages, how the deflection is laid off in the direction of the tail of your bomber (Rule 1). Note also how all fighters coming from the same
angle are given the same deflection (Rule 2)—regardless of whether they come from
above, below, or to one side. All the fighters on these two pages are on cone
1 and take a 1 rod deflection. |
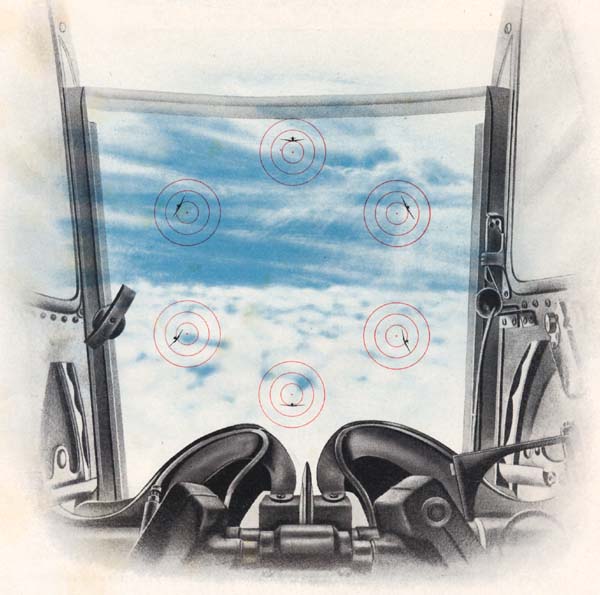 |
The tail gunner aims like this... On tail attacks you always aim inside the fighter. When he dives on you, aim below him. When he climbs on you, aim above him. In these illustrations, of course, the sliding motion of the fighter toward the bomber's tail cannot be seen. But the point of aim has been placed along his line of apparent motion. |
Restricted
S-16
In attacks from the front, the fighter's line of apparent motion is still in the direction of your bomber's tail. If you have trouble thinking of aiming in the direction of the tail, just remember to aim away from your bomber's nose—which is the same thing.
|
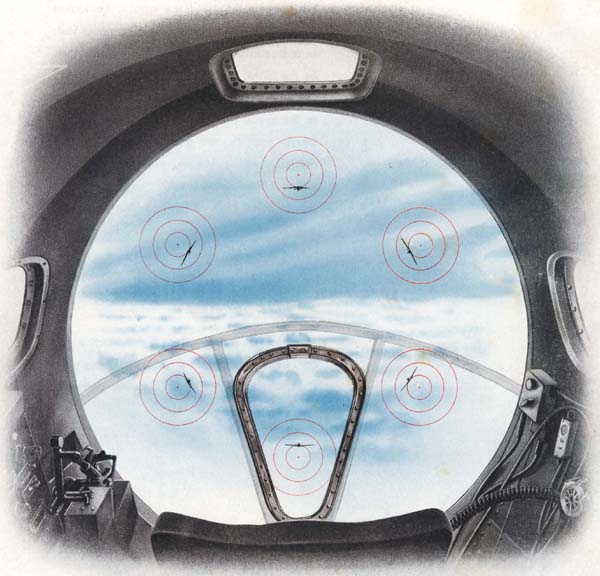 |
The bow gunner aims like this... On frontal attacks, you always aim outside the fighter. When he dives on you, aim above him. When he climbs on you, aim below him. |
Restricted
S-17
Deflection changes during an attack . . .
|
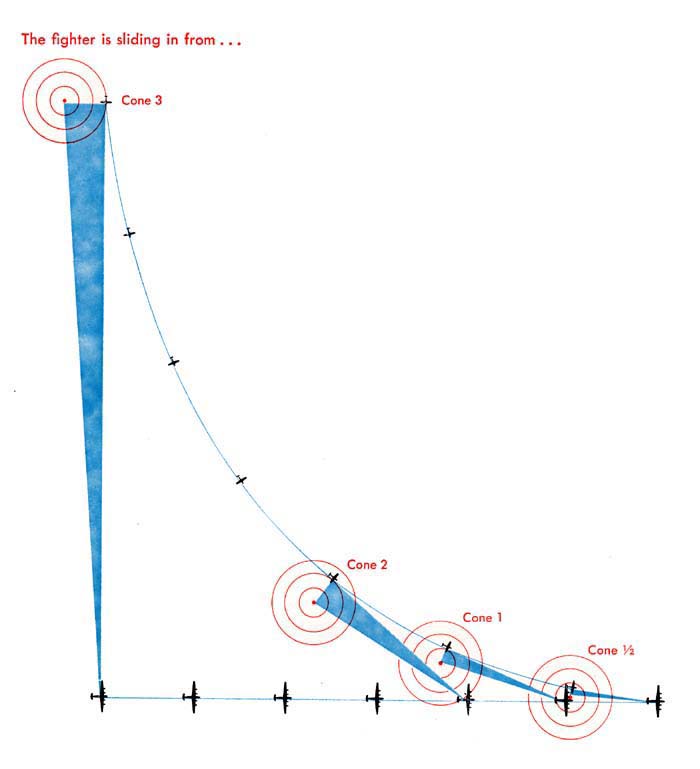 |
The fighter never stays on one cone. His pursuit curve always forces him closer to the bomber's tail. During the attack, he moves from one cone to another—and he moves fast. In a beam attack, where the fighter starts at the 3-rad position, he drifts to the 2-rad position, then to the 1-rad position and finally to the 1/2-rad position. Unless you change your deflection as the fighter's angle changes, your aim becomes wrong almost immediately. So the third rule of Position Firing is: Change your deflection during the attack This is not easy to do. Get
all the practice you can. Remember that the trick is to swing your guns smoothly,
like a good batter swinging at a pitched ball. |
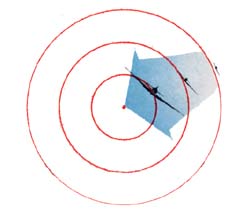 |
On all attacks from side or rear, let the fighter drift toward the center of your sight. |
Restricted
S-18
 | |||
| He is on your beam at right angles. Give him 3 rads | As he
slides to Cone 2, reduce your defection slowly | He swings to Cone
1. Follow through smoothly to give him 1 rad. | As he moves to
Cone 1/2 |
| |||
 | |||
| If a fighter starts a bow attack on Cone 1/2, he will move very quickly to Cone 1 even faster toward Cone 2—if he can hold his pursuit curve that long without blacking out. | |||
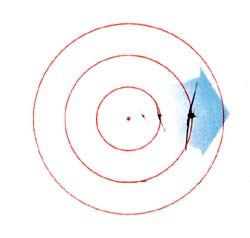 | |||
On attacks from the front, let the fighter drift away from the center of your sight.
| |||
When he's on Cone 1/2, | He
changes to Cone 1. Let him drift out to the 1 rad ring. | As he whips
toward Cone 2, increase deflection to 2 rads. |
 | ||
Restricted
S-19
You've got to be on the ball —or else. No bomber is safe unless each gunner searches the sky constantly throughout each mission. Search systematically and continuously the portion of sky assigned to you, especially in the sun and in broken clouds, where fighters like to hide. Be ready for any trick from any fighter you see. You are responsible for seeing that your airplane is never surprised. Bombers and their crews have been needlessly lost because gunners were
not watching and let fighters sneak in on them. |
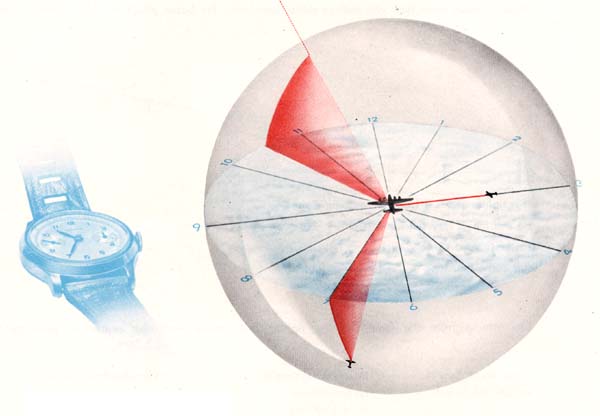 |
. . . has nothing to do with the cones. You
use it to tell the entire crew when there are enemy Simply think of your bomber as flying in the center
of a huge clock, the face of which is on a |
Restricted
S-22
If you are a tail gunner, don't be confused by the fact that you are riding backward. You are facing 6 o'clock. 3 o'clock is on your left, 9 o'clock is on your right..
|
When
you spot an enemy, sound of . . . |
|
For the top fighter in the picture call: |
|
| For the right hand fighter call: |
|
| For the bottom fighter call: |
|
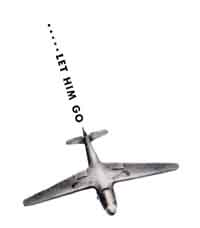
Never fail to sound off when bandits appear, because you may be the only one who sees them. No single crew member can see all the sky around the bomber from his turret or window. Even the pilot can see very little except straight ahead. Your warning may be the crew's only notice of an attack. It will help other gunners bring their guns to bear and will allow the pilot to take the necessary evasive action. On the other hand, don't jam the interphone with excited double talk. Be sure to say "coming in", but only when the fighter really turns in. Otherwise you may have the whole crew swinging their guns at a plane a mile away, while some smart fighter slips in and picks you off. Some pilots may want you to call "in range" when the fighter is about to get his guns bearing, to guide them in any special evasive action they may wish to take. |
Restricted
S-21
 |
Expert studies show that aerial machine guns are most effective at ranges up to 2000 feet. Very careful calculations prove that further out bullets scatter so widely that they make your chances of a hit almost entirely a matter of luck. You can't hope to break even on the game that way. Most fighters who are any good won't open up on you outside of 2000 feet. A good fighter pilot may wait until he is much closer. Watch him through your ring sight. Be ready with the right deflection and let him have it at 2000 feet. Nose attacks are so fast that you should begin shooting when he's lined up on you—normally at 3000 feet. The exact time to start firing and the proper length of burst
to fire depend on combat conditions. They are determined, in each theater, by
the type of mission usually flown, ammunition loads, and enemy tactics. |
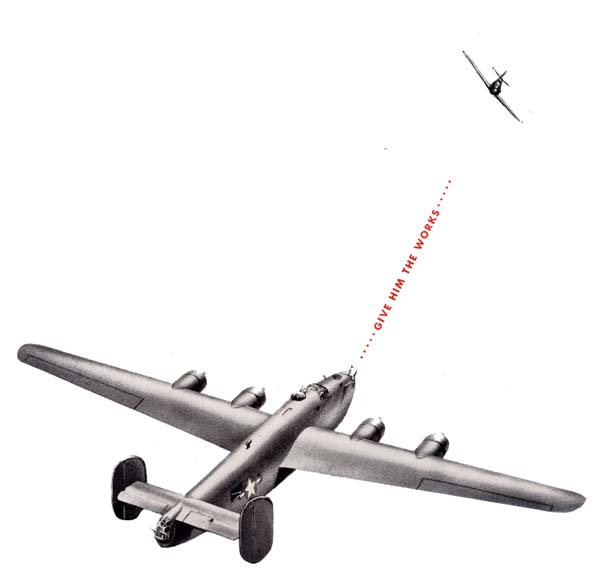 |
If you do run out of ammunition, or
your guns fail, keep swinging them at the enemy anyway. Never let them know you
can't hurt them—or they will be all over you. |
 |
Restricted
S-22
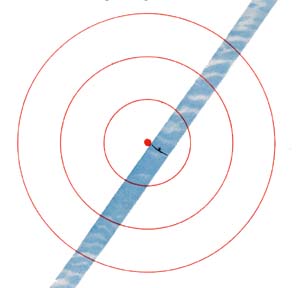
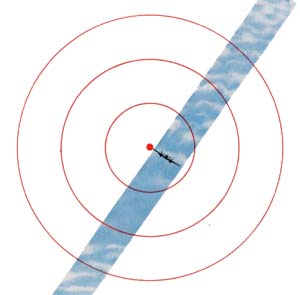
You can tell the range . . . by the size of the fighter in the 35
mil rod of your sight. At 2000 feet the average single engine fighter fills about
1/2 rod in your ring sight. Most twin engine fighters fill 3/4 of a rod. At 3000
feet they fill less—1/2 of a rod for a single engine fighter and 1/2 of a
rod for a twin engine fighter. | |
| How a fighter looks at 200 feet | |
| Single engine fighter | Twin engine fighter |
 |  |
| Average
single engine fighter | Range | Average
twin engine fighter |
| 1/3 rad | 3000 feet | 1/2 rad |
| 1/2 rad | 2000 feet | 3/4 rad |
Restricted
S-23
When you spot a fighter— or get the warning over the interphone— be ready for anything. There's no use kidding yourself. Enemy fighter
pilots are good. They know every trick in the book. A smart fighter pilot will also use weather. He will sneak out of a cloud or out of the sun—trying to get in close before you can see him. Often fighters will gang up. One fighter, or several, will make fake attacks to draw your attention. In the meantime, the real attack will come from somewhere else. Against these tactics, your best defense is to keep alert—and
to keep calm at the same time. Watch every enemy fighter carefully, but don't
let him trick you in to firing at him when you don't have a chance. | |
On pages S-26-31 you will see four fundamental fighter attacks To make these
attacks, the fighter must go through certain | |
That's when he's your meat. | |
Restricted
S-1
| Overtaking The fighter flies a parallel course with the bomber, usually more than 3000 feet away. He continues this until he reaches the right point for his . . . |  |
Turn-in | 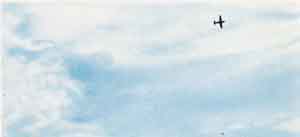 |
| Overtaking He has now turned toward you, but must still reverse his turn to get his guns bearing. |  |
| As he does this, he rolls his high wing down, which brings him to the beginning of . . . |  |
| Guns Bearing This is where you get him. Rapidly growing larger as he comes closer, he appears to slide back toward your tail. |  |
| Breakaway When he decides to break off, the fighter sometimes makes a climbing, but more often a diving turn. He frequently rolls over on his back to expose his seat armor as he tries to get away and into position for a new attack. | 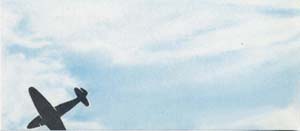 |
Restricted
S-25
SIDE attack . . . The side attack is usually used against single
bombers, rarely against formations. It can be made from above, at, or slightly
below your level. |
 |
The planes in the white circles on this and the following pages show how the fighter looks from the bomber during the different phases of the attacks illustrated. |
Restricted
S-26
| From
a top turret ... | ||||
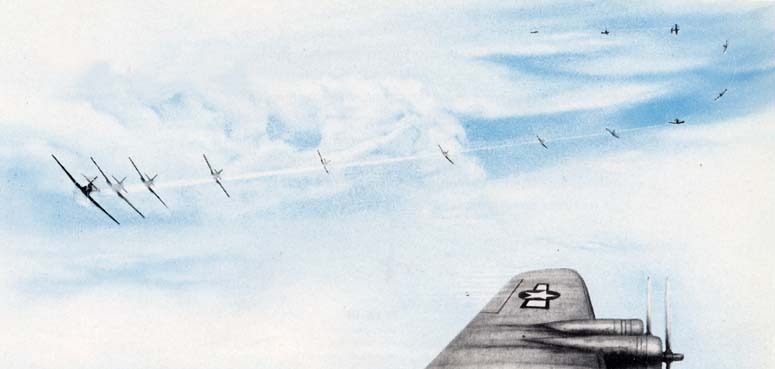 | ||||
A high side attack looks like this. Out of range, the fighter pulls ahead of you. His far wing goes up, and for a moment he seems to hang from it as though from a hook. He then quickly swings into a head on position and starts his apparent slide. Rolling his high wing down, he moves in a straight line toward your tail. As he shifts from cone to cone, he gets bigger. He may break away above you. This gives you a momentary no deflection shot only if he appears to hang there. More often he'll roll on his back and dive away under you. | ||||
 | ||||
1 He's over 3000 feet "Give the word" but hold your fire. | 2 Still too far but start tracking him. | 3 2000 feet on Cone 3. Give him 3 rads and start shooting. | 4 1000 feet By now he's on Cone 2. Let him drift smoothly toward your sight center. |
|
Restricted
S-27
Bow attacks |
are extremely fast. Closing speeds may be 500 to 700 miles per hour. They may be made by fighters intercepting your formation, or overtaking you while flying in the same direction. The enemy will fly out to the side, well out of range, until he reaches a point far ahead. After turning until he faces you, he rolls through and hurtles toward you. He may try for a few seconds to hold a pursuit curve, a little from the side, and probably high. Or he may come from dead ahead, generally almost level with you, and possibly roll over on his back as he dives under you. |
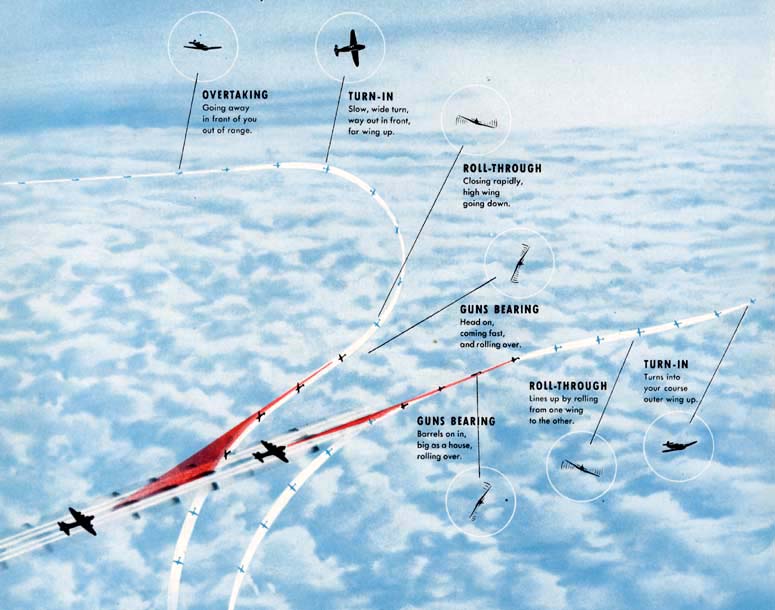 |
Fighters ganging up like to use the bow attack. Sometimes they will line up to the side and turn in, one after another. They may even come at you in line abreast from dead ahead. Or they may dive in pairs from high out of the sun. |
Restricted
S-28
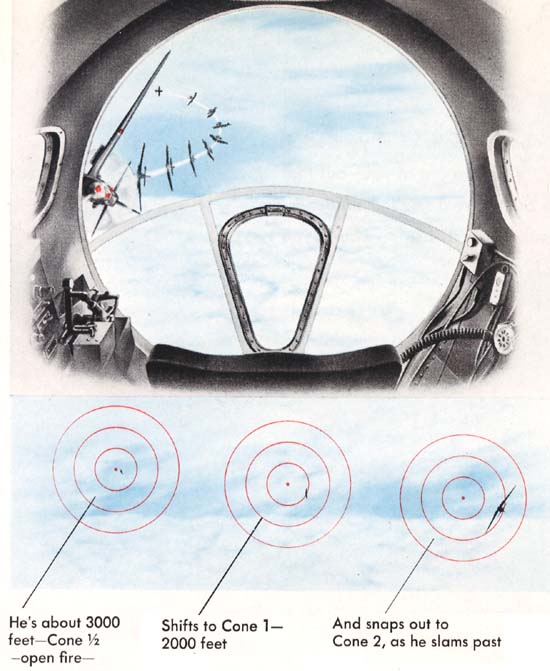 |
To a bow gunner ... ... a bow attack from the side looks like this. The fighter tries to hold a curve of pursuit for a second or two. As he does it, you must let him drift away from the center of your sight. This illustration shows how you should follow him in your sight.
|
In an attack from dead ahead the fighter lines up with the bomber. He may roll over on his back or come straight on in as shown here. He grows larger at tremendous speed, and whips past almost before you know it. You only have a few seconds, but if you keep cool, he's an easy shot—almost no deflection. It is a little high, so you aim just above him as he expands in your sight . . . Because of the tremendous closing speed, you should begin firing at all bow attacks when the fighter is about 3000 feet out. | 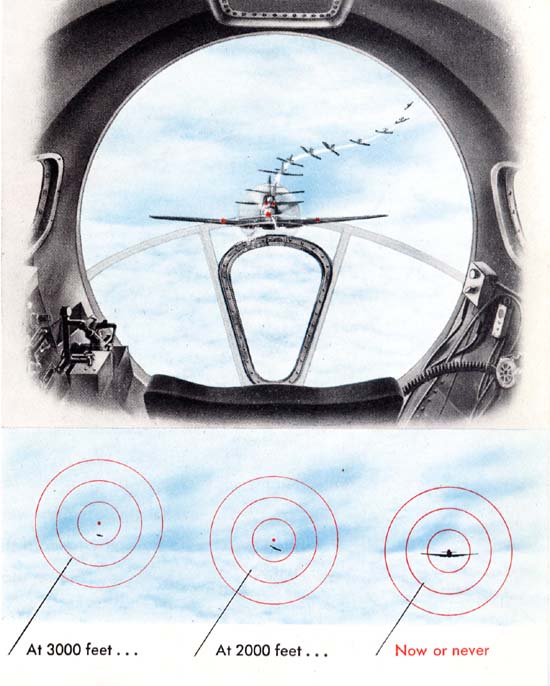 |
Restricted
S-29
| TAIL attack . . . |
| Tail attacks may come from above, below, or at your level. They give the
fighter the longest time to fire at you—but that works both ways. You and
he both have a small or no deflection shot, but with your turrets the odds are
on you if you know your stuff. |
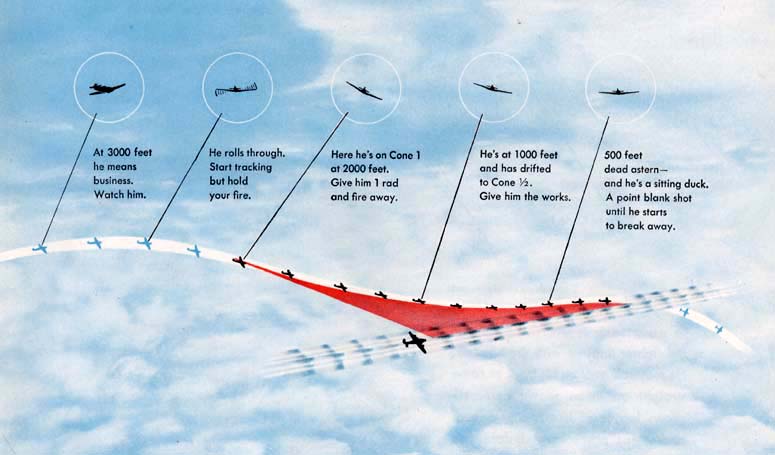 |
A single enemy may dive in at an angle for a quick burst and twist away. Or several fighters may weave in and out, dead astern. Or one of a pair may try to distract you from a real attack by the other. Keep your fire on the one who keeps coming in. As soon as a fighter breaks away, forget him. |
Restricted
S-30
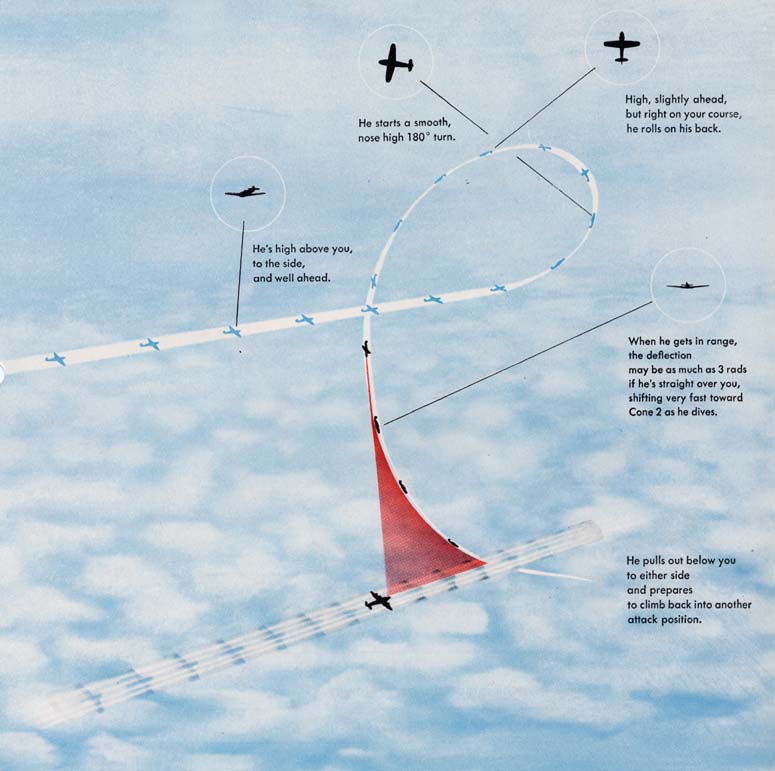
| OVERHEAD attacks |
| are rarely seen, because few fighter pilots are expert enough to try them.
But if they are pulled on you by a good pilot, watch out. Don't be caught flat-footed.
The fighter will count on surprising you. His dive is very fast, and you have
a tough overhead shot. Any fighter high above you flying in the same direction
you are, or on an opposite course, can dive into this attack. |
 |
Restricted
S-31
When
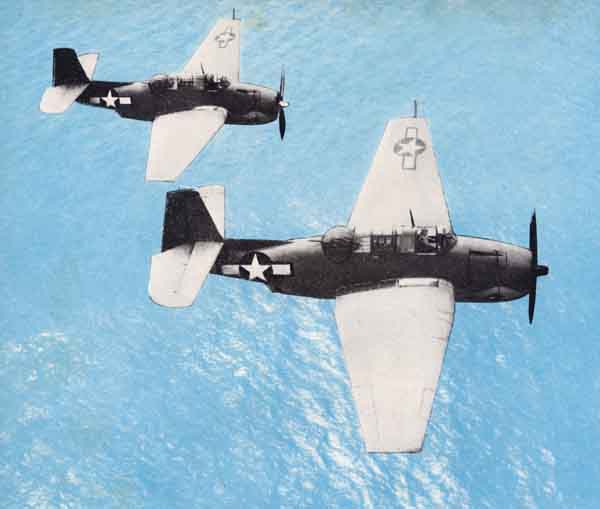
you finally take off— | |
| • | Remember
that Position Firing is used only with 35 mil rod ring sights—not with computing
sights—and only against fighters attacking you on a pursuit curve—or
fly through. |
| • | Position Firing is no cure all but it does take care of the enemy when he is most dangerous to you. |
| • | Never let anybody sneak up on you. |
| • | Spot his cone—pick the right deflection—stay with him. |
| • | Don't waste your ammunition. |
| • | Use your sight and—never be caught with your guns down. |
Restricted
S-32